Image

How to Install Windows Server 2012 domain controller to an existing Windows 2008 or 2003 domain

There are two ways to install Windows 2012 DCs to an existing domain as shown:

1)    Perform an in-place upgrade of an existing domain controller is not recommended 
2)    Install a new Windows 2012 Server domain controller.

Notes: 

– Domain Controllers that running Windows Server 2008 or 2008 R2 can be upgraded to Windows 2012 Domain Controllers.  You can upgrade a Windows 2008 DC to a comparable Ver. of Windows 2012.

– If you are running a Domain Controller based on Windows 2008 Standard or Enterprise edition you can upgrade to Windows Server 2012 Standard or Datacentre edition.  If you are upgrading from Datacentre edition you can only upgrade to Windows Server 2012 Datacentre edition. So if you’re running 2008 and if you’re running Windows 2003 Domain Controllers you must upgraded to Windows 2008 as an interim step, then upgraded to Windows Server 2012.

– the Forest and the Domain functional level must be Windows 2003 or higher.

– Before install the new Windows 2012 Domain Controller, or attempting to perform an in-place upgrade of an existing Windows 2008 or 2008 R2  DC, you must make sure that the Schema is upgraded to support your new Windows 2012 DC, to do this we can do it automatically within the promotion of the first 2010 domain controller or youcan be run it separately by use the ADPREP.exe tool found in the support\adprep folder on your installation media of windows 2012 and run the two ADPREP.exe commands as shown:

ADPREP.exe /forestprep (to prepare the Schema) and ADPREP.EXE /DOMAINPREP /GPPREP (to prepare each domain).

In order to run ADPREP.exe /forestprep and ADPREP.exe /domainprep /gpprep you need to be a member of the following groups:

  • Scheme Admins
  • Enterprise Admins
  • Domain Admins

Install a new Windows 2012 Server domain controller:

          Promoting the Domain Controller DCPROMO is deprecated beginning with Windows Server 2012.  Instead you will use the Active Directory Domain Services configuration wizard.  Say that 10 times fast!  After installing the AD DS Role, you will use either a separate wizard within Server Manager, or using the ADDSDeployment PowerShell module to promote your Domain Controller.

AD DS Role Installation:

  1. In Server Manager, click Manage and click Add Roles and Features to start the Add Roles Wizard.
  2. On the Before you begin page, click Next.
  3. On the Select installation type page, click Role-based or feature-based installation and then click Next.
  4. On the Select destination server page, click Select a server from the server pool, click the name of the server where you want to install AD DS and then click Next.

  5. On the Select server roles page and select Active Directory Domain Services then on the Add Roles and Features Wizard dialog box, click Add Features then click Next.

  6. On the Select features page, select any additional features you want to install and click Next.

  7. On the Active Directory Domain Services page, review the information and then click Next.

  8. On the Confirm installation selections page, click Install.

  9. On the Results page, verify that the installation succeeded, and click Promote this server to a domain controller to start the Active Directory Domain Services Configuration Wizard.

Promote to Domain Controller:

1. On the Deployment Configuration page, you have three choices.

    • Add a domain controller to an existing domain
    • Add a new domain to an existing forest
    • Add a new forest

Since we are just adding a 2012 Domain Controller to our environment, we will select the first option.

2. Click Domain Name System (DNS) server, Global Catalog (GC), or Read Only Domain Controller (RODC) as needed, choose the site name, and type the DSRM password and then click Next.

3. Select the domain controller that you want to replicate the AD DS installation data from (or allow the wizard to select any domain controller).

4. On the Paths page, type the locations for the Active Directory database, log files, and SYSVOL folder (or accept default locations), and click Next.

5. On the Review Options page confirm your selections, and click Next.

6. The Prerequisites Check is a new feature in AD DS 2012 domain configuration.  This new phase validates that the server configuration is capable of supporting a new AD DS forest.  These checks will alert you with suggested repair options. The Checks will also inform you of new security changes that will affect older operating systems.

On the Prerequisites Check page, confirm that prerequisite validation completed and then click Install.

7. Clicking install will begin the domain controller promotion process.  This is the last opportunity to cancel the entire installation.  After it starts, there is no going back.  The server will reboot automatically at the end of the promotion.  The server will write two logs during the promotion.  You can check them at the following locations.

  • %systemroot%\debug\dcpromo.log
  • %systemroot%\debug\dcpromoui.log

You now have a Windows 2012 Domain Controller in your environment.

How to setup a Windows 2008 R2 Domain Controller

This Blog will guide you through how to setup a Windows 2008 R2 Domain Controller.

On your Windows 2008 R2 server click Start – Run and type dcpromo .

01 windows domain controller install setup How to setup a Windows 2008 R2 Domain Controller

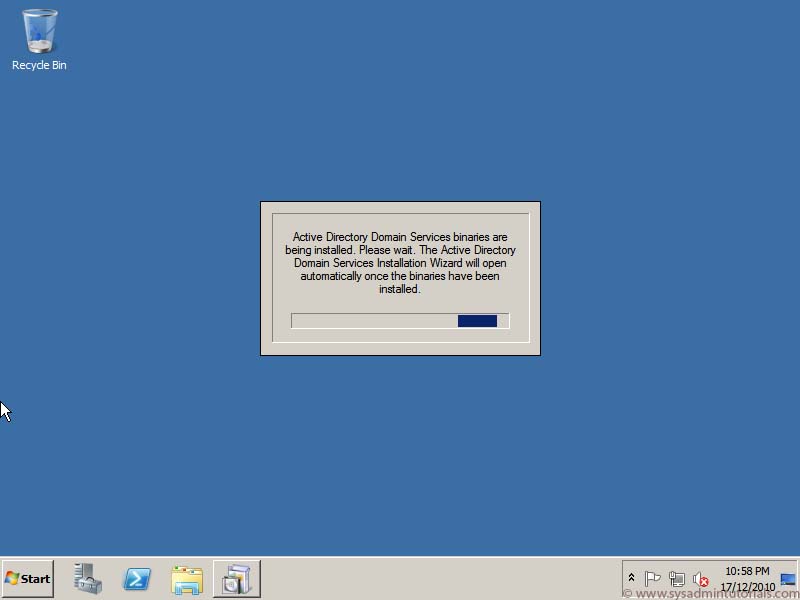
2. The Active Directory Domain Services binaries are installed and then the installation wizard will start.


02 windows domain controller install setup How to setup a Windows 2008 R2 Domain Controller
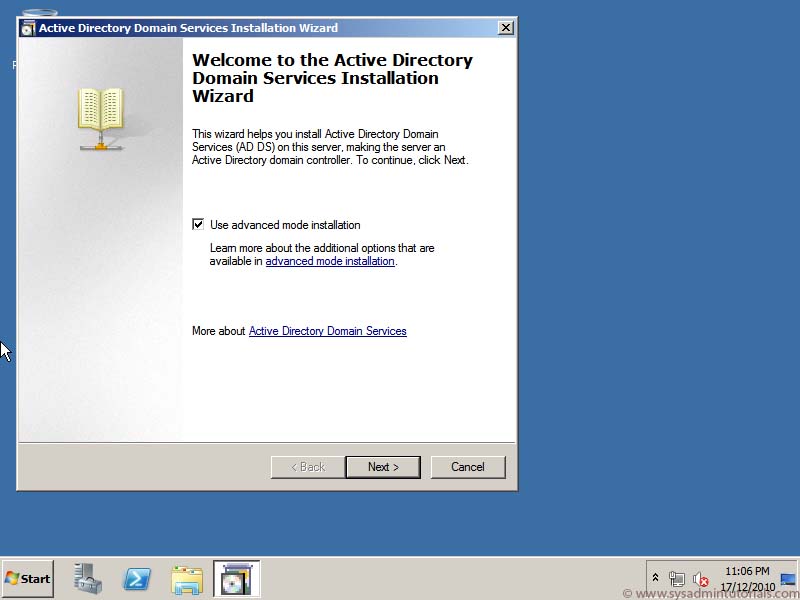
3. Click Use advanced mode installation (as we’ll have more options than basic mode) and click Next.


03 windows domain controller install setup How to setup a Windows 2008 R2 Domain Controller
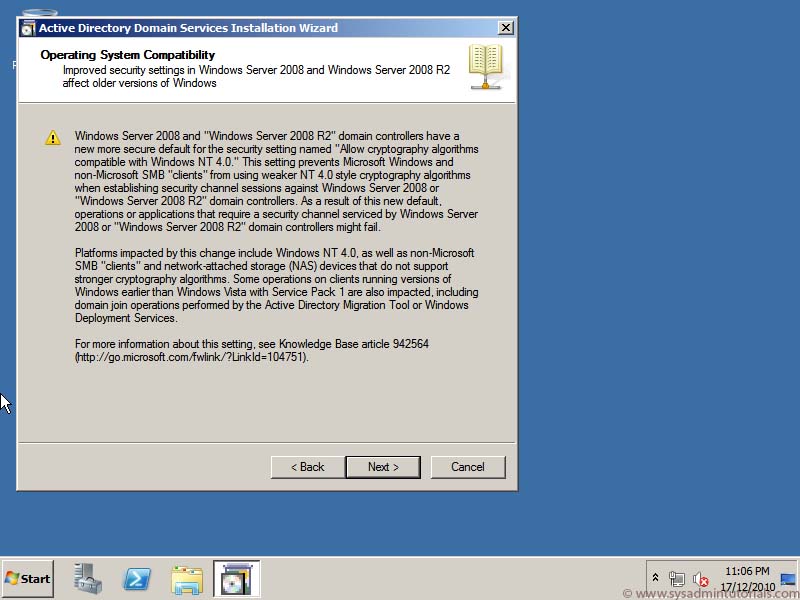
4. A brief note on Operating System Compatibility mainly between NT4.0 is shown. Click Next.


04 windows domain controller install setup How to setup a Windows 2008 R2 Domain Controller
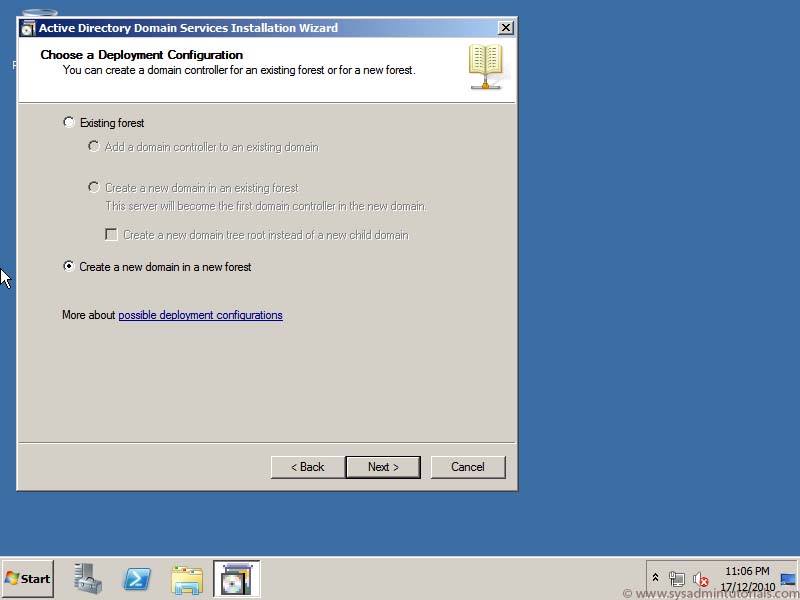
5. We are going to be creating a new domain in a new forest. (This is the first and only domain controller in my lab). Click Next. If we were wanting to add an additional domain controller to a domain we would select Existing Forest and Add a domain controller to an existing domain.


05 windows domain controller install setup How to setup a Windows 2008 R2 Domain Controller
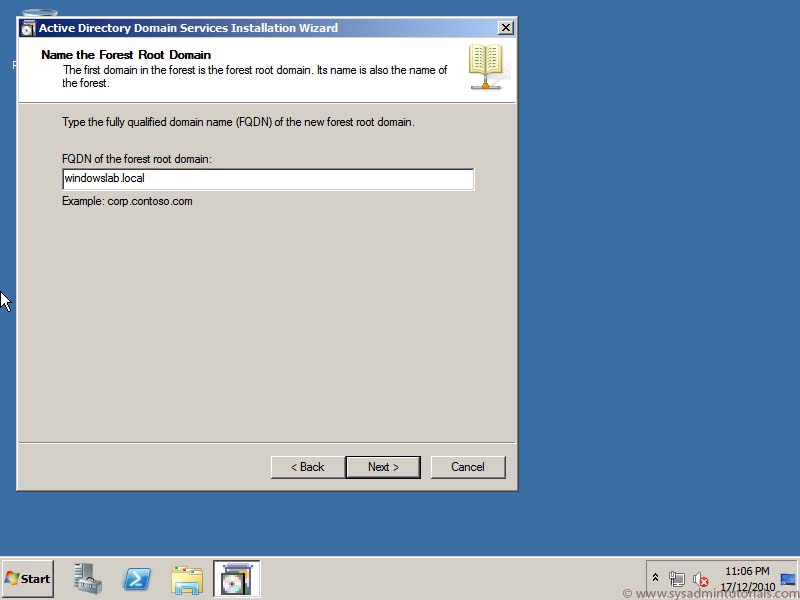
6. Type in the Fully Qualified Domain Name (FQDN) of what you would like your Active Directory domain to be. Click Next.


06 windows domain controller install setup How to setup a Windows 2008 R2 Domain Controller
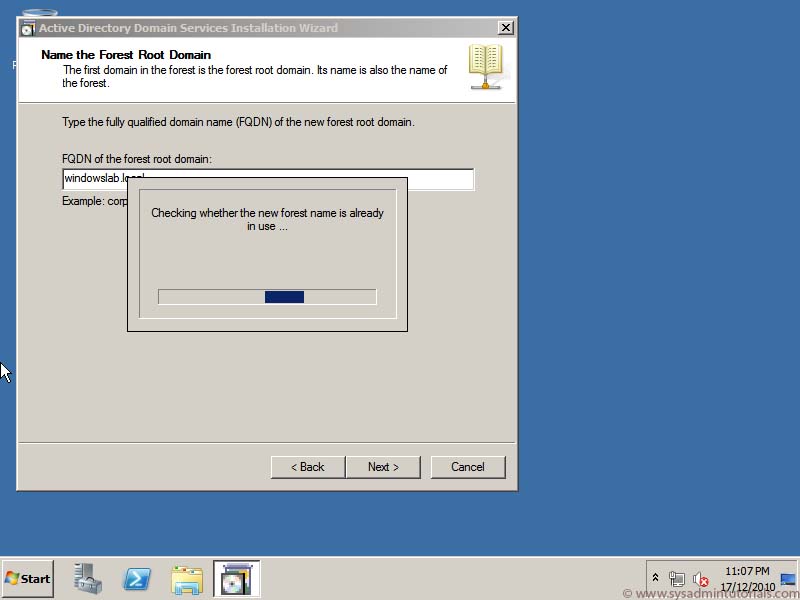
7. A DNS check is performed to see if the domain name already exists.


07 windows domain controller install setup How to setup a Windows 2008 R2 Domain Controller
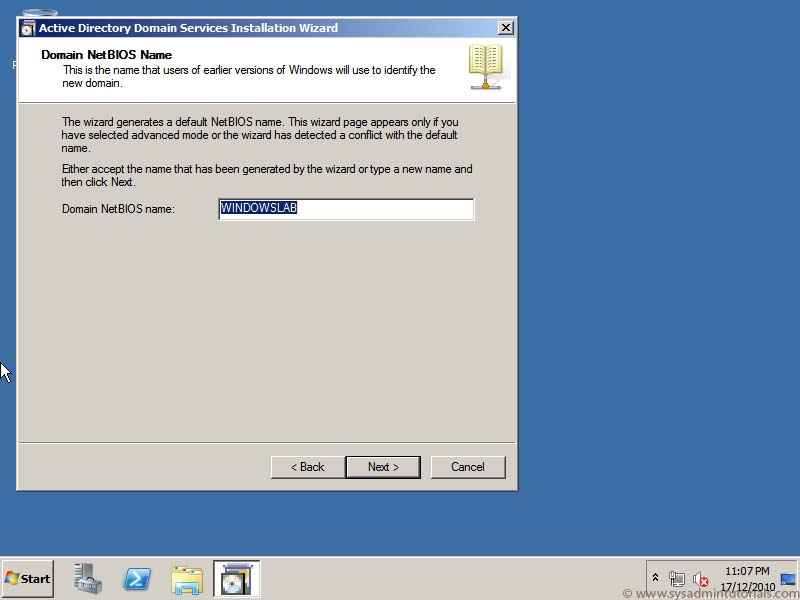
8. The Domain NetBIOS name is a shortened name of your FQDN that you typed in earlier. Click Next.


08 windows domain controller install setup How to setup a Windows 2008 R2 Domain Controller
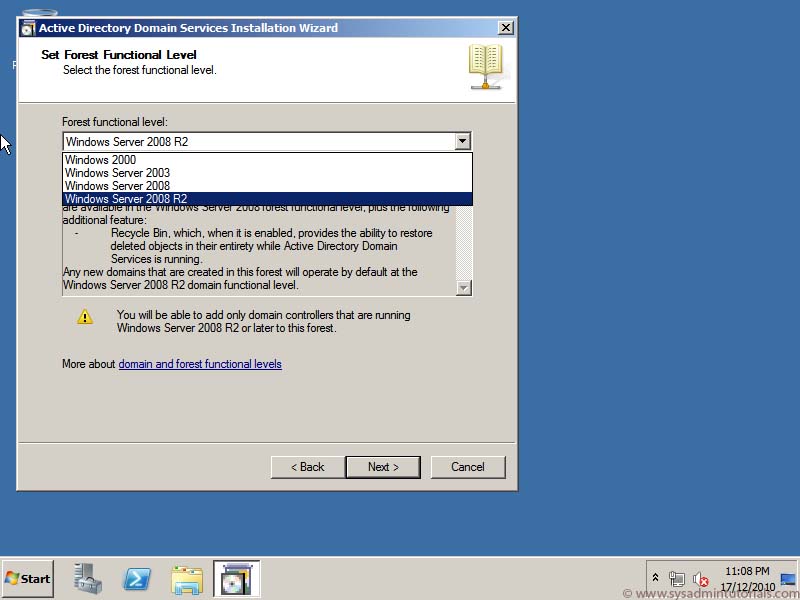
9. In this step we need to select our Forest Functional Level. Easiest way to decide what to use is if you still have Windows 2000 domain controllers in your Active Directory select Windows 2000. If you have Windows 2003 domain controllers in your Activie Directory select Windows 2003, same applies for Windows 2008. However if your domain controllers only contain Windows 2008 R2 servers, select Windows 2008 R2. Click Next. You can alway raise the Forest Functional Level, i.e. if you have Windows 2003 Domain Controllers that you will be decommissioning in time, however you can’t lower the Forest Functional Level.


09 windows domain controller install setup How to setup a Windows 2008 R2 Domain Controller
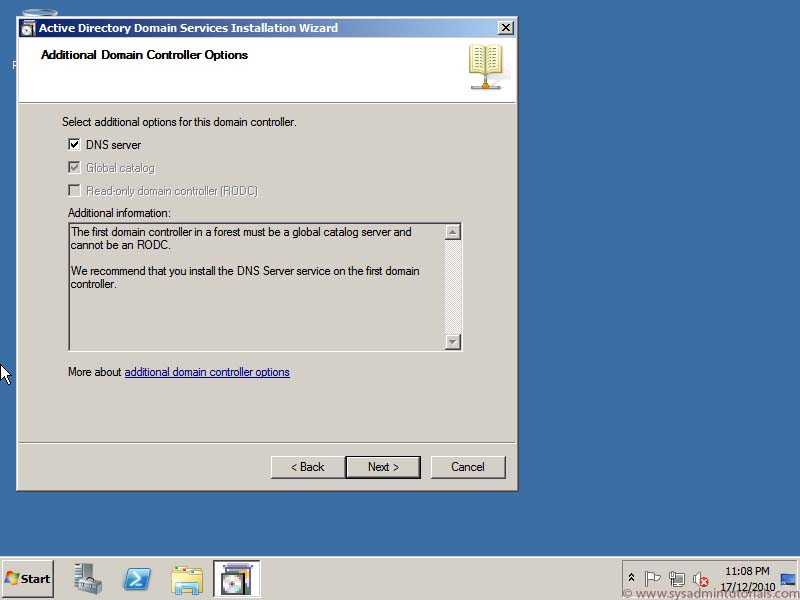
10. Always select DNS server with a domain controller. The Role will be installed automatically when you select this option. Click Next.


10 windows domain controller install setup How to setup a Windows 2008 R2 Domain Controller
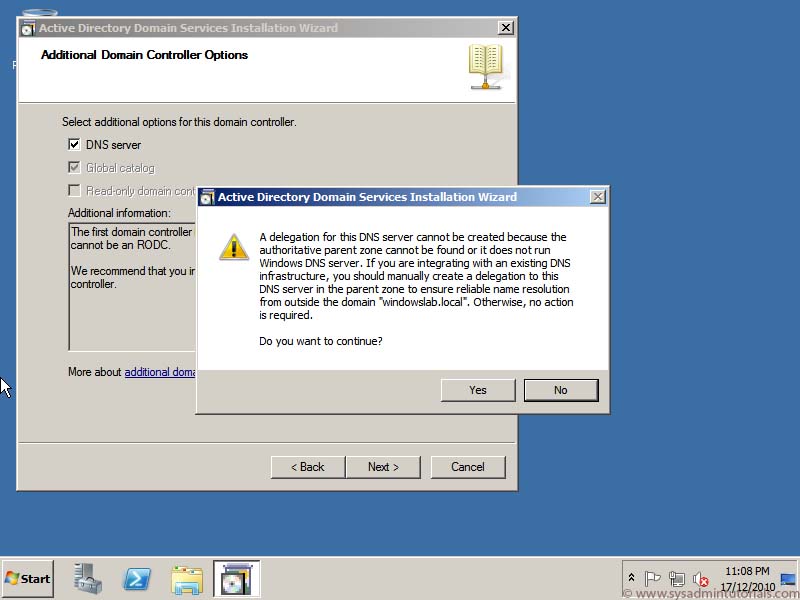
11. We are creating any delegations for DNS and our DNS windowslab.local does not exist externally therefore we can click Yes.


11 windows domain controller install setup How to setup a Windows 2008 R2 Domain Controller
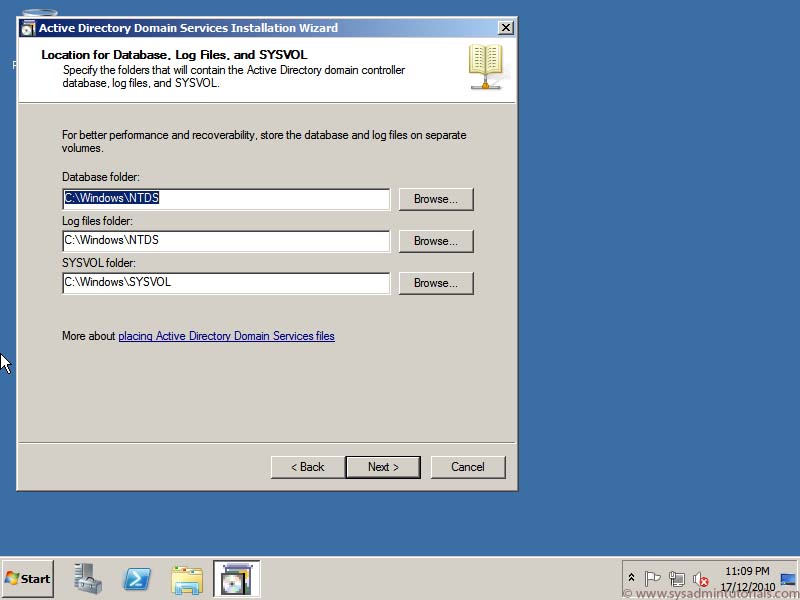
12. Here we can change the locations of the Database, Log and SYSVOL folder or accept the defaults. Click Next. You may want to click on and read the link “placing Active Directory Domain Services Files” to determine if you should place these folders on separate drives.


12 windows domain controller install setup How to setup a Windows 2008 R2 Domain Controller
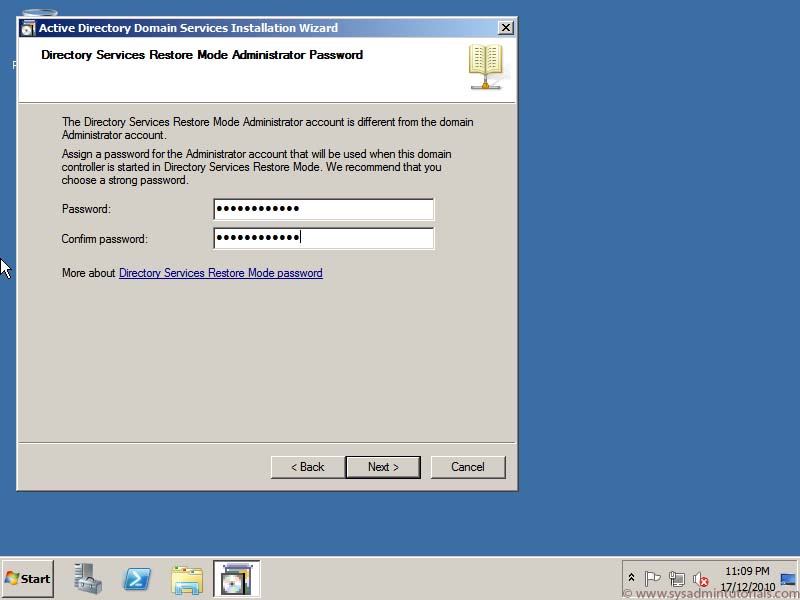
13. Set a directory services restore password, be sure to remember this password or keep it in a safe place, as this password is used to restore active directory in the event of a disaster where Active Directory needs to be restored.


13 windows domain controller install setup How to setup a Windows 2008 R2 Domain Controller
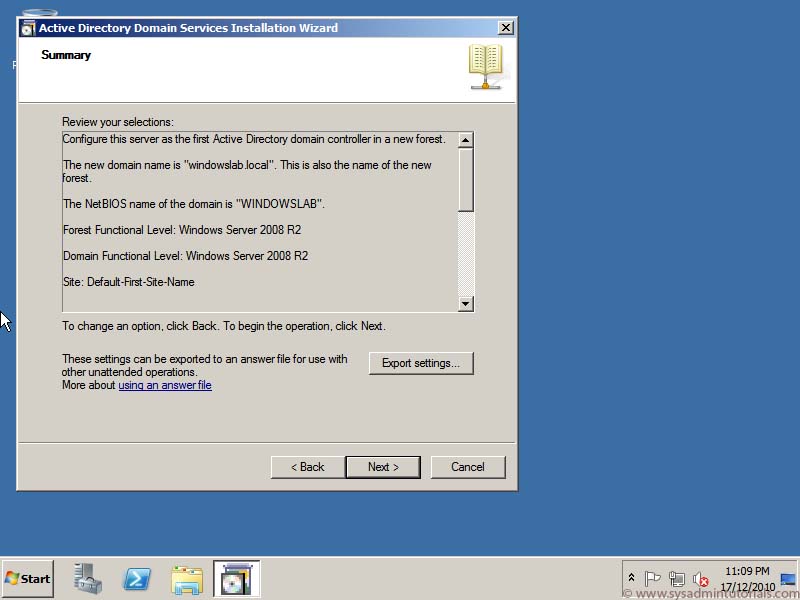
14. We are now presented with a summary of the setup wizard. If you are happy with the summary click Next. You can also export the settings to use for unattended installations of Windows 2008 R2 Domain Controller.


14 windows domain controller install setup How to setup a Windows 2008 R2 Domain Controller
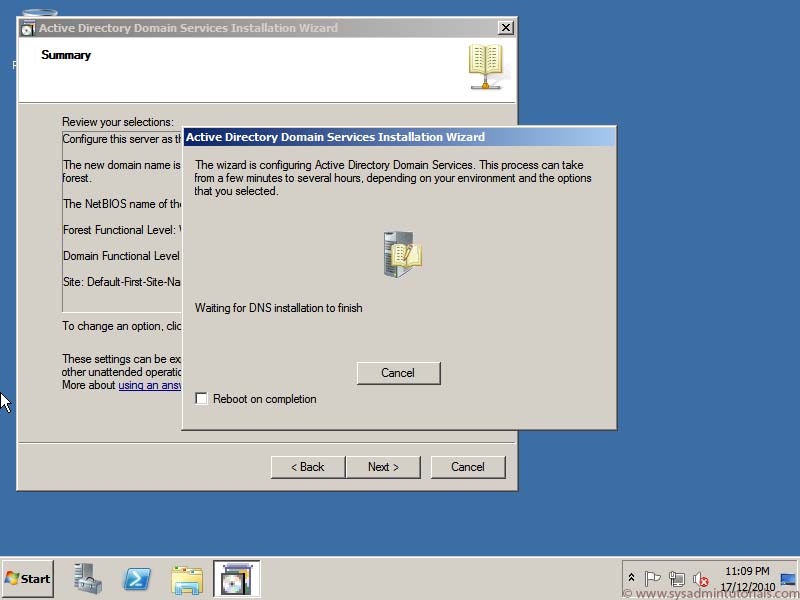
15. Active Directory is now being configured along with the DNS role.


15 windows domain controller install setup How to setup a Windows 2008 R2 Domain Controller
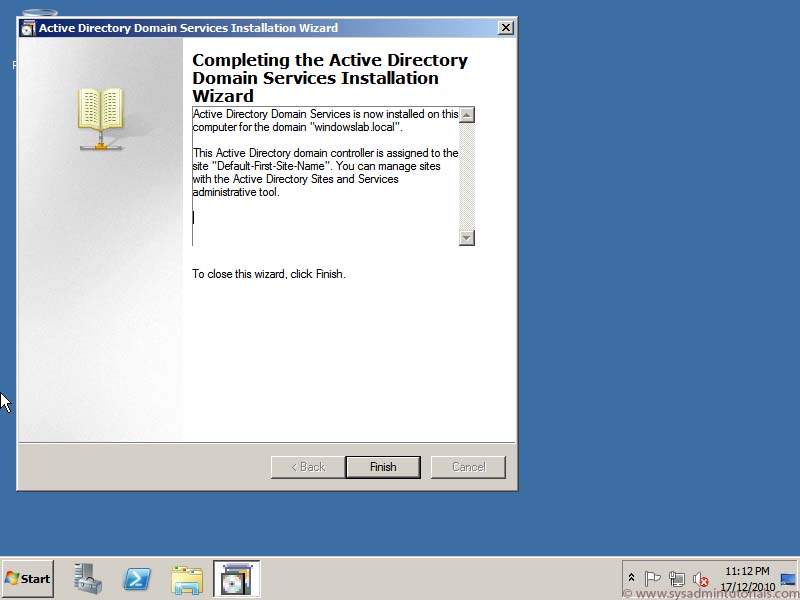
16. The install is now complete. Click Finish.


16 windows domain controller install setup How to setup a Windows 2008 R2 Domain Controller
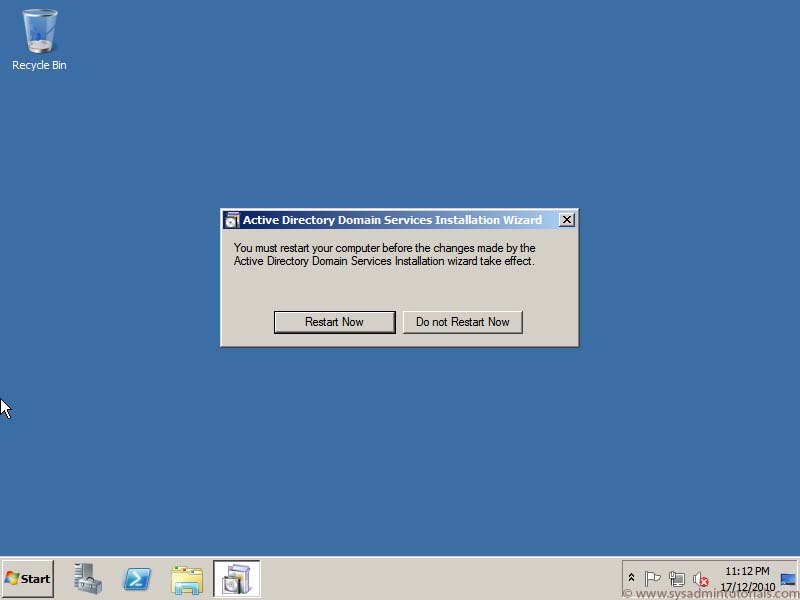
17. You will be asked to reboot the server.


17 windows domain controller install setup How to setup a Windows 2008 R2 Domain Controller
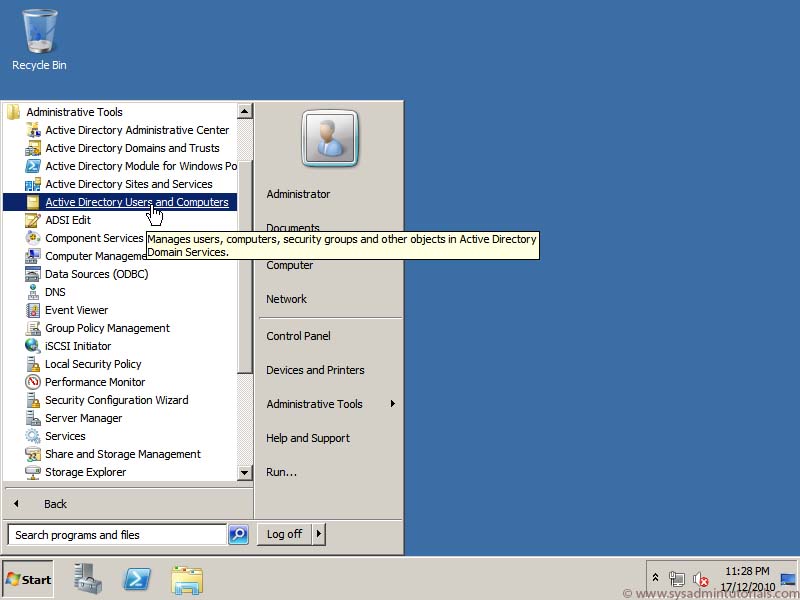
18. Once the server reboots and you’ve logged in, click on Start – Administrative Tools and you can see all the Active Directory tools that have been installed to administer the domain.


18 windows domain controller install setup How to setup a Windows 2008 R2 Domain Controller
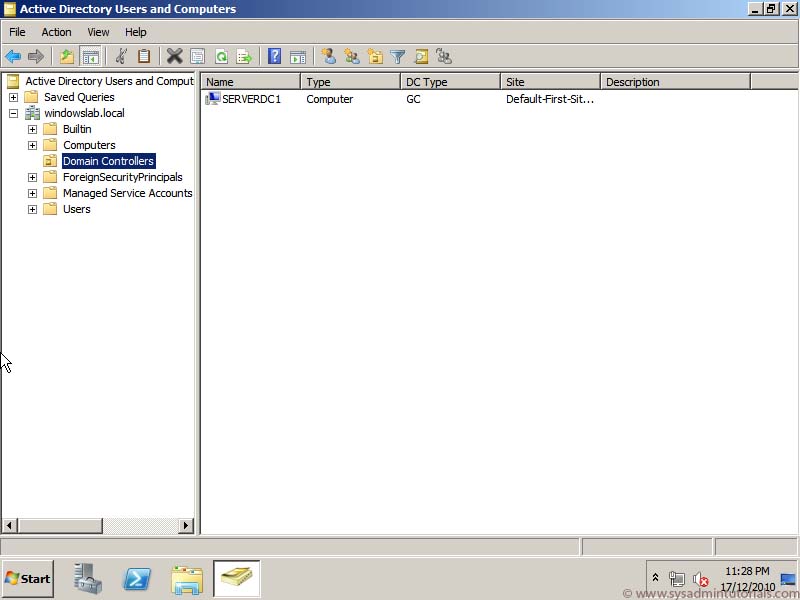
19. In Active Directory Users and Computers you can see that my server “SERVERDC1″ is located in the Domain Controllers Organisation Unit (OU).


19 windows domain controller install setup How to setup a Windows 2008 R2 Domain Controller

Migrating CA from 2003 server to a Different server 2008

Migrating Windows Certificate Authority Server from Windows 2003 Standard to windows 2008 Enterprise Server:

Migrating Windows Certificate Authority Server from Windows 2003 Standalone on DC to windows 2008 Enterprise Server. Dude to Various advantages on Installing CA on Windows 2008 Server like windows 2008 server supports v1, v2 and v3 certificate templates, R2 windows 2008 Enterprise CA server also supports Cross Forest Certificates. Below article helps to you migrate CA From windows 2003 Standard Edition to windows 2008 Enterprise Edition

Moving Certificate Server:

  1. Perform System State backup on Source CA Server
  2. Backup CA from CA Console
  3. Backup CA registry Configuration
  4. Uninstall CA from the Source Server using Add remove programs
  5. Install the CA as Role on the target Windows 2008 computer using existing certificate key
  6. Restore the CA database on the target CA
  7. Import the CA Registry configuration on the target CA
  8. Complete post-migration tasks

Perform  System State backup on Source CA

  1. Log in to Source server and Take System State backup using Ntbackup to C:\CertBackup

Backup CA from CA Console

  1. Open the Certification Authority snap-in
  2. Right-click the node with the CA name, point to All Tasks, and then click Back Up CA.
  3. On the Welcome page of the CA Backup wizard, click Next. On the Items to Back Up page, select the Private key and CA certificate and Certificate database and certificate database log check boxes, enter the backup location, and then click Next

4. On the Select a Password page, enter a password to protect the CA private key and click Next.

5. On Completing the Backup Wizard page, click Finish.

6. This will create Files in C:\Certbackup

  • Ef.com.p12
  • Database

Backup CA registery Configuration

1.   Click Start, point to Run, and type regedit to open the Registry Editor.

2.   In HKEY_LOCAL_MACHINE\SYSTEM\CurrentControlSet\Services\CertSvc, right-click Configuration, and then click Export.

3.   Enter a location and file name, and then click Save. This creates a .reg file with the registry configuration information for your CA.

UnInstall CA from the Server using Add remove programs

1. Go To Add remove programs -> Add remove Windows components -> click on Certificate Services and uncheck on Certificate Services CA and Certificate Services Web Enrollment Support

Install the CA as Role on the target computer using exisintg certificate key

  1. Install New Widows 2008 Enterprise Edition Sever
  2. Open Server Manager and Add New Role
  3. Select Active Directory Certificate Services
  4. Select Certificate Authority and Next
  5. Select Enterprise CA  and Next
  6. Use Existing Private Key as show below and select selct a certificate and user its associated private key and Next

7. Click on Browse buttong to Search folder containing certificate and private key which you exported from Source computer

8. Enter the password which was used to export

9. Next , Next and click on Install

Restore the CA database on the target CA

  1. Open the Certification Authority snap-in.
  2. Right-click the node with the CA name, point to All Tasks, and then click Restore CA. Click OK to confirm stopping the CA service.
  3. In the CA Restore wizard, on the Welcome page, click Next.
  4. On the Items to Restore page, select Certificate database and certificate database log. Click Browse, and navigate to the location of the Database folder that contains the CA database export files created when you previously exported the CA database.
  5. Enter the password you used to export the CA database from the source CA, if a password is requested.
  6. Click Finish, and then click Yes to confirm restarting the CA.

Import the CA Registery configuration on the target CA.

  1. Double click on registery file which you exported from the source server to import the same into the server and Yes to confirm the same

Complete post-migration tasks

Updating CRL Distribution Point and Authority Information Access Extensions

  1. Loging to Windows 2008 New CA Server
  2. Open Certificate MMC
  3. Right click on the CA and click on Extenstion and click on ADD and add the below line by changing SourceServername.

ldap:///CN=<CATruncatedName><CRLNameSuffix>,CN=SourceServername,CN=CDP,CN=Public Key Services,CN=Services,<ConfigurationContainer><CDPObjectClass>

4. Check Publish CRLs to this location

5. Publish Delta CRLs to this location

6. Apply and OK

7. Verify the CA can publish CRLs to the new location.

8. Open the Certification Authority snap-in.

9. Right-click Revoked Certificates, point to All Tasks, and click Publish.

10. Click either New CRL or Delta CRL only, and click OK.

To verify ACLs on the AIA and CDP containers

  1. Loging to DC and open Active Direcotry Sites in Services
  2. On the Console click on Top Node
  3. Click View and Show Services node
  4. you will find Services folder on the Left and expand to reach Public key Services as shown below

5. Expand Public Key Services

6. click AIA folder and In the details pane, select the name of the source CA.

7.  On the Action menu, click Properties.

8.  Click the Security tab, and then click Add.

9.  Click Object Types, click Computers, and then click OK.

10. Type the host name of the target CA, and click OK.

11. In the Allow column, select Full Control, and click OK.

12. In the left pane, select CDP and the host name of the source CA.

13. In the details pane, select the first CRL object.

14. On the Action menu, click Properties, and then click the Security tab.

15. In the list of permitted group or user names, select the name of the source CA, click Remove, and then click Add.

16. Click Object Types, select Computers, and then click OK.

17. Type the host name of the target CA, and click OK.

18. In the Allow column, select Full Control, and then click OK.

19.     In the details pane, select the next CRL object, and repeat steps 14 through 18 until you have reached the last object.

Verifying ReGistery

1. Verify that CAServerName is a registry string value located under the HKEY_LOCAL_MACHINE\SYSTEM\CurrentControlSet\Services\CertSvc\Configuration\CAName\ registry key. It should be updated to represent the DNS or the host of the new CA host.

2. Verify that CACertPublicationURLs and CRLPublicationURLs are both registry multi-string values located under the same key as CAServerName.

3.  Check the remaining registry values under the HKEY_LOCAL_MACHINE\SYSTEM\CurrentControlSet\Services\CertSvc registry key, with emphasis on any values that have been customized to ensure that they are free of data containing the old CA host name or other invalid CA settings. For example:

  • Configuration\ConfigurationDirectory
  • Configuration\CAName\CACertFilename

Cleaning lingering objects across the forest

What are lingering objects?

Lingering objects are objects that exist on one or more DCs that do not exist on other DCs hosting the same partition. They may be introduced in any partition except the schema. They are essentially object delete operations that do not successfully replicate to a DCs/GCs that host the partition of the deleted object. Eventually the tombstoned (deleted) object will be garbage collected which destroys all knowledge of the delete and purges the object from the database. They can be introduced through a few mechanisms:

  • Failing replication for more than the tombstone lifetime (TSL)
  • System state restores using a backup that is older than TSL
  • Dcpromos using IFM media that is older than TSL.

There are a few methods available but I will cover repadmin.exe /removelingeringobjects. The following steps assume all DCs are running W2K3. I Plan to write a future blog on other methods that can be used when W2K DCs are in the mix.

The command to clean out lingering objects looks like the following.

repadmin /removelingeringobjects <targetDCFQDN> <sourceDCguid> <partitionLDAPdn>

It specifies a target DC by DN, a source DC by GUID, and an NC to be cleaned. The target DC is cleaned using a reference DC for the comparison. The reference DC must always be writable for the partition being cleaned and the target DC may be WR or RO.

It can be run in advisory mode to have the DC report an event identifying each lingering object.

repadmin /removelingeringobjects <targetDCFQDN> <sourceDCguid> <partitionLDAPdn> /ADVISORY_MODE

This command must be run 2(Nwr-1) to clean the writable DCs for the NC. For NCs that have RO copies (all domain NCs), it must also be run (Nro) more times.

Configuration and NDNCs (2(N-1) * # of NCs). Domain NCs (2(Nwr-1)+(Nro)*NCs). N = # of DCs hosting the partition.

An example forest of 10 GCs, 5 domain NCs (2 DCs each), and 6 application partitions (forestdnszones hosted on all 10 DCs and domaindnszones in each domain hosted on each DC in their respective domains) will require 96 executions of repadmin.

Consider the following illustration that explains how the above methodology is the most efficient and thorough approach possible with repadmin /removelingeringobjects.

DC1,2,3,4 all host a writable copy of domain A. DC5,6,7,8,9,10 host a read only copy of domain A.

DC1 will be chosen as an initial target for this illustration. DC1 may be clean or dirty with respect to lingering objects.

1) Clean a target DC.

    • Repadmin /removelingeringobjects <DC1> <DC2guid> <domain A LDAP DN>
    • Repadmin /removelingeringobjects <DC1> <DC3guid> <domain A LDAP DN>
    • Repadmin /removelingeringobjects <DC1> <DC4guid> <domain A LDAP DN>

DC1 is now clean as compared to DC2,3,4.

DC1 now becomes the source to be used to clean DC2,3,4

2) Clean remaining DCs using the target in 1) above as the source DC.

    • Repadmin /removelingeringobjects <DC2> <DC1guid> <domain A LDAP DN>
    • Repadmin /removelingeringobjects <DC3> <DC1guid> <domain A LDAP DN>
    • Repadmin /removelingeringobjects <DC4> <DC1guid> <domain A LDAP DN>

DC2,3,4 are now clean with respect to DC1. This approach makes DC1,2,3,4 consistent with each other.

At this point any writable DC for domain A can be used as a source to clean the DCs hosting a read only copy of domain A.

DC1 will be chosen as the source DC for cleaning the DCs hosting read only copies of domain A.

3) Clean all DCs hosting a read only copy of domain A.

    • Repadmin /removelingeringobjects <DC5> <DC1guid> <domain A LDAP DN>
    • Repadmin /removelingeringobjects <DC6> <DC1guid> <domain A LDAP DN>
    • Repadmin /removelingeringobjects <DC7> <DC1guid> <domain A LDAP DN>
    • Repadmin /removelingeringobjects <DC8> <DC1guid> <domain A LDAP DN>
    • Repadmin /removelingeringobjects <DC9> <DC1guid> <domain A LDAP DN>
    • Repadmin /removelingeringobjects <DC10> <DC1guid> <domain A LDAP DN>

At this point all DCs hosting a read only copy of domain A are consistent with each other and are consistent* with the writable DCs for domain A.

* The abandoned delete scenario is not addressed with the above method. There is no in the box method to discover, report on , and remove objects that are lingering in the writable as compared to the read only. Working with Microsoft PSS is currently necessary to leverage an internal tool to compare LDIFDE.exe dumps that will report on lingering objects in the writable partition.

So, how do you apply the above methodology to your forest?

Simple! Of course, you must have RPC connectivity between each source and target identified in the repadmin command.

Apply steps 1 & 2 for all non domain partitions. This means the configuration partition and all application partitions.

Apply steps 1 & 2 & 3 for all domain partitions.

*** Note ***

There is a tool available that calls the same API (namely DsReplicaVerifyObjects http://msdn.microsoft.com/en-us/library/ms676035(VS.85).aspx ) used by repadmin /rlo and automates above process of cleaning all NCs in a forest using a single command line. repldiag.exe http://www.codeplex.com/ActiveDirectoryUtils/Release/ProjectReleases.aspx?ReleaseId=13664

What default logging of the process is provided during the exercise?

Every target DC will log details about the cleaning exercise such as a start event, an event for each lingering object purged, and a finish event summarizing the number of lingering objects removed.

The following is an example of the start of a clean cycle on a particular NC.

Event Type: Information Event Source: NTDS Replication Event Category: Replication Event ID: 1937 Date:  11/8/2007 Time:  1:38:23 PM User:  TAILSPINTOYS\Administrator Computer: W2K3ENTR2-VM3 Description: Active Directory has begun the removal of lingering objects on the local domain controller. All objects on this domain controller will have their existence verified on the following source domain controller.   Source domain controller: 150efcda-20b4-4f1f-9b48-705665bfc095._msdcs.tailspintoys.com    Objects that have been deleted and garbage collected on the source domain controller yet still exist on this domain controller will be deleted. Subsequent event log entries will list all deleted objects.

Note:  This is worth repeating. “Objects that have been deleted and garbage collected on the source domain controller yet still exist on this domain controller will be deleted.”

If you run the same cleanup command multiple times, you may see the 1945 events referencing deleted objects that were cleaned because they happened to be garbage collected on the source DC used in the clean command.  This is of no concern as the objects will have been purged on the next run of the garbage collection process anyway.  This is more likely in larger more dynamic environments.

Next are the events specifying the objects deemed lingering that were deleted.  There will be one for every object deleted, so be sure the DS event log is sufficiently large enough to hold all these events for reporting as well as so other unrelated events are not lost to a full event log.

Event Type: Warning Event Source: NTDS Replication Event Category: Replication Event ID: 1945 Date:  11/8/2007 Time:  1:38:52 PM User:  TAILSPINTOYS\Administrator Computer: W2K3ENTR2-VM3 Description: Active Directory will remove the following lingering object on the local domain controller because it had been deleted and garbage collected on the source domain controller without being deleted on this domain controller.    Object: CN=retail1003,OU=retail,DC=tailspintoys,DC=com  Object GUID: 5e83e965-f802-4d7a-8372-d35a43820515 Source domain controller: 150efcda-20b4-4f1f-9b48-705665bfc095._msdcs.tailspintoys.com

Finally, there is a summary event detailing the number of lingering objects deleted on the server.

Event Type: Information Event Source: NTDS Replication Event Category: Replication Event ID: 1939 Date:  11/8/2007 Time:  1:38:52 PM User:  TAILSPINTOYS\Administrator Computer: W2K3ENTR2-VM3 Description: Active Directory has completed the removal of lingering objects on the local domain controller. All objects on this domain controller have had their existence verified on the following source domain controller.   Source domain controller: 150efcda-20b4-4f1f-9b48-705665bfc095._msdcs.tailspintoys.com  Number of objects deleted: 16    Objects that were deleted and garbage collected on the source domain controller yet existed on the local domain controller were deleted from the local domain controller. Past event log entries list these deleted objects.

These postings are provided “AS IS” with no warranties, and confers no rights. The content of this site are personal opinions and do not represent the Microsoft corporation view in anyway. In addition, thoughts and opinions often change. Because a weblog is intended to provide a semi-permanent point-in-time snapshot, you should not consider out of date posts to reflect current thoughts and opinions.